Quantcast
Channel: Ebbes Nørderi (Ebbes Nerdery)
Viewing all 53 articles
Browse latest View live

Post InventJournal by X++ code

$
0
0

I have faced the problem to post InventJournal from code.
I found a possible solution. Here is a job, that demonstrate this solution:

static void JobInventJournalPost(Args _args)
{
    InventJournalCheckPost_Movement journalCheckPost_Mov;
    InventJournalCheckPost_Tag journalCheckPost_Tag;

    InventJournalCheckPost journalCheckPost;

    InventJournalTable inventJournalTable;
    InventJournalId inventJournalId = ‘Inv002372′;

    JournalCheckPost getJournalCheckPost(InventJournalTable _inventJournalTable)
    {
        // \Menu Items\Action\InventJournalPost
        switch(_inventJournalTable.journalType)
        {
            case InventJournalType::Movement:
            case InventJournalType::LossProfit:
            case InventJournalType::Transfer:
            case InventJournalType::BOM:
            case InventJournalType::Count:
            case InventJournalType::project:
            case InventJournalType::Asset:
                journalCheckPost_Mov = InventJournalCheckPost_Movement::newJournalCheckPost(
                false,true, JournalCheckPostType::Post, _inventJournalTable.tableId,                            _inventJournalTable.journalId);
                // journalTransData = _journalForm.JournalTransData();
                // if (journalTransData)
                // journalCheckPost_Mov.parmVoucher(journalTransData.journalTrans().voucher);
                return journalCheckPost_Mov;

            case InventJournalType::TagCounting:
                journalCheckPost = InventJournalCheckPost_Tag::newJournalCheckPost(
                false, true, JournalCheckPostType::Post, _inventJournalTable.tableId,                           _inventJournalTable.journalId);

                return journalCheckPost_Tag;
        }
    }
    ;

    inventJournalTable = InventJournalTable::find(inventJournalId);
    if(inventJournalTable)
    {
        // Posting start. According to \Classes\InventJournalCheckPost
        // journalForm.runbaseMainStart();

        journalTableData::updateBlockServer(
        inventJournalTable, JournalBlockLevel::None, JournalBlockLevel::System, false);

        journalCheckPost = getJournalCheckPost(inventJournalTable);
        if (!journalCheckPost.PROMPT())
        {
            if (! journalCheckPost.BatchInfo().parmBatchExecute())
            {

                // journalForm.runbaseMainCancel();
                journalTableData::updateBlockServer(
                inventJournalTable, JournalBlockLevel::System, JournalBlockLevel::None, false);
            }

            return;

        }

        try
        {
            journalCheckPost.run();
            // journalForm.runbaseMainEnd(journalCheckPost,false);
            journalTableData::updateBlockServer(
            inventJournalTable, JournalBlockLevel::System, JournalBlockLevel::None, false);
        }

        catch (Exception::Error)
        {
            // journalForm.runbaseMainEnd(journalCheckPost,true);
            journalTableData::updateBlockServer(
            inventJournalTable, JournalBlockLevel::System, JournalBlockLevel::None, true);
        }
        // Posting end
    }
}


Found the code here: http://rusgon.blogspot.dk/2008/02/posting-inventjournal-from-x.html


WMS movement by X++ code

$
0
0

Here is a simple method to move a quantity of items from one WMSlocation to an other.


void createPostTransferJournal(ItemID _itemId, Qty _qty, WMSLocationId _from, WMSLocationId _to)
{
    InventJournalTable      inventJournalTable;
    InventJournalTrans      inventJournalTrans;
    InventJournalCheckPost  inventJournalCheckPost;
    //NumberSeq               num;
    boolean                 _throwsError=true;
    boolean                 _showInforesult=false;
    InventDim               fromInventDim;
    InventDim               toInventDim;

    InventLocationId getInventLocationId(WMSLocationId _id)
    {  // WMSLocationId must be unique over all WMSLocationId
        return ((select firstOnly WMSLocation where WMSLocation.wMSLocationId == _id).inventLocationId);
    }
    ;
    ttsbegin;

    inventJournalTable.clear();
    //num                                 =   new NumberSeq();
    //num                                 =   NumberSeq::newGetNum(InventParameters::numRefTransferId());
    inventJournalTable.initFromInventJournalName(InventJournalName::find(InventParameters::find().TransferJournalNameId));
    inventJournalTable.Description = "Inventory Transfer Journal";
    inventJournalTable.SystemBlocked = true;
    inventJournalTable.insert();
    //info("Entry Inserted");
    //info(strfmt("The Voucher generated is %1",inventJournalTable.JournalId));

    inventJournalTrans.clear();
    inventJournalTrans.initFromInventJournalTable(inventJournalTable);
    inventJournalTrans.ItemId = _itemId;

    fromInventDim.wMSLocationId = _from;
    fromInventDim.InventLocationId = getInventLocationId(_from);
    //frominventDim.configId = "02";
    //frominventDim.inventSiteId = "2";
    fromInventDim = InventDim::findOrCreate(frominventDim);

    toInventDim.wMSLocationId = _to;
    toInventDim.InventLocationId = getInventLocationId(_to);
    //ToinventDim.InventSiteId = "3";
    //ToinventDim.configId = "02";
    toInventDim = InventDim::findOrCreate(ToinventDim);

    inventJournalTrans.InventDimId = frominventDim.inventDimId;
    inventJournalTrans.initFromInventTable(InventTable::find(_itemId));
    inventJournalTrans.Qty = -_qty;
    inventJournalTrans.CostAmount = -inventJournalTrans.CostAmount;
    inventJournalTrans.ToInventDimId = ToinventDim.inventDimId;
    inventJournalTrans.TransDate = SystemDateget();
    inventJournalTrans.insert();

    inventJournalCheckPost = InventJournalCheckPost::newJournalCheckPost(JournalCheckpostType::Post,inventJournalTable);
    inventJournalCheckPost.parmThrowCheckFailed(_throwsError);
    inventJournalCheckPost.parmShowInfoResult(_showInforesult);
    inventJournalCheckPost.run();

    inventJournalTable.SystemBlocked = false;
    inventJournalTable.update();

    ttscommit;
}

ShutDown AX by code

$
0
0

Here is a click-method that close the AX client without any furher prompts.

void clicked()
{
    info            info;
    SysGlobalCache  cache = appl.globalCache();
    ;
    super();

    cache.set(classstr(info), identifierstr(Autologoff), true);
    info = new info();
    info.shutDown(true);
}

Change form header by code

$
0
0

element.design().caption(strfmt(‘%1 – %2′,"Receiption",VendTable::find(PurchTable.OrderAccount).Name));

Override the event methods on dialog controls in Dynamics AX

$
0
0

I found info here: http://dynamicsaxsolutionsworld.blogspot.dk/2010/12/override-event-methods-on-dialog.html

In generally most of the Form control events (Modifying Field, Cursor movements, Focusing events, etc…) can override using standard AX method. But in dialog control events are not as straight forward as it is on form controls. Today I’m going to show how we can override Dialog controls events.

Step 1: Create a Class extends by RunBaseBatch class & declare main variables. In my example I have extended by RunBaseBatch Class.

class Test_DialogField extends RunBasebatch
{
    CustAccount CustId;
    DialogField dialogCustId;
    DialogField dialoglName;
    Dialog dialog;

    #define.CurrentVersion(1)
    #localmacro.CurrentList
    CustId
    #endmacro
}

Step 2: Add Pack() & Unpack() methods. Here I have not written code to store & retrieve stored data. But I added those methods to avoid compiling errors.

public container pack()
{
    return connull();
}

public boolean unpack(container packedClass)
{
    return true;
}

Step 3: Add Main() method to Execute class.

static void main(Args args)
{
    Test_DialogField tmpDialogField = new Test_DialogField();
    ;
    if (tmpDialogField.prompt())
        tmpDialogField.run();
}

Step 4: The dialogPostRun() method should override like below. This will allow calling to the event methods.

public void dialogPostRun(DialogRunbase tmpdialog)
{
    super(tmpdialog);
    tmpdialog.dialogForm().formRun().controlMethodOverload(true);
    tmpdialog.dialogForm().formRun().controlMethodOverloadObject(this);
}

Step 5: Add code to display dialog fields.

protected Object dialog(DialogRunbase tmpdialog, boolean forceOnClient)
{
    ;
    dialog = super(tmpdialog,forceOnClient);
    dialogCustId = dialog.addFieldValue(typeid(CustAccount),"Customer", "Customer");
    dialoglName = dialog.addFieldValue(typeid(Name),"Name", "Name");
    return dialog;
}

Step 6: When we have used Dialog field in the class, that Dialog field name in the System will appear with a different format. Its look like: fld<ID>_1. This ID value can be changed according to number of dialog filed which we have used. By using following step we can get exact Field ID & system Name.

· Run the class which you created

· Right Click on the Customer field & select “Setup”

· You will get below form. I have coloured Dialog Filed System name by RED Colour. In my example System name of the Customer Dialog Field is Fld1_1.

This System Name we should use to write our “modified” method. Then it will call whenever a value of the dialog control with ID 1 is modified. In our case it is Customer ID field.

public boolean fld1_1_modified()
{
    FormStringControl control = dialog.formRun().controlCallingMethod();
    boolean isFieldModified;
    ;
    isFieldModified = control.modified();
    if(isFieldModified)
    {
        dialoglName.value(custTable::find(control.text()).Name);
    }
    return isFieldModified;
}

When you execute the class & select a customer Id, then above method will call & return the customer Name to other dialog box.

Hope you got an idea about overriding the Dialog Field methods in Dynamics AX… Enjoy in Dynamics AX World.

My comment:

In stead of Right Click on the dialog field & select “Setup”, you can use macros to inform about the field id. By uncommenting/commenting the DEFINE.Show, the Ids is displayed. It is usefull if you in the future are moving around fields.

public Object dialog()
{
//#define.Show
#localmacro._ShowName
    #if.Show
        info("%1: " + %1.name());
    #endif
#endmacro
    ;
    dialog = super();

    dialogMarkText    = dialog.addFieldValue(extendedTypeStr(String255),valueMarkText   ,"Mark"  ,"kjhkjhljkhlkjh");
    #_ShowName(dialogMarkText)

    dialogProjectType = dialog.addFieldValue(extendedTypeStr(String255),valueProjectType,"Type"   ,"hfjhgfjhgf");
    #_ShowName(dialogProjectType)
    dialogProjectType.lookupButton(FormLookupButton::Always);

    dialogProjectName = dialog.addFieldValue(extendedTypeStr(String255),valueProjectName,"Project","lkjhlkjhlkjhl");
    #_ShowName(dialogProjectName)
    dialogProjectName.lookupButton(FormLookupButton::Always);

    return dialog;
}

Set text in form window header

$
0
0

element.design().caption(strfmt(‘%1 – %2′,"Vendor",VendTable::find(PurchTable.OrderAccount).Name));

How to pick and post packing slip by code

$
0
0

Found here http://blogs.bojensen.eu/?p=945

See here how to register a new InventPick and post a packingslip

static void PickAndPackingSlip( InventtransId   _InventtransId  = "XXXXX",
                                             InventDimId     _InventDimId    = "XXXXX",
                                             Int             _Qty            = 100)
{
    TmpInventTransWMS               TmpInventTransWMS;
    InventMovement                  InventMovement;
    InventTransOrigin               InventTransOrigin;
    SalesLine                       SalesLine;
    InventTrans                     InventTrans;
    inventTransWMS_Pick             inventTransWMS_Pick;
    Query                           inventTransQuery;
    QueryBuildDataSource            QueryBuildDataSource;
    SalesFormLetter                 SalesFormLetter;
    SalesTable                      SalesTable;
    ;
    inventTransQuery                = new Query();
    QueryBuildDataSource            = inventTransQuery.addDataSource(tableNum(InventTrans));
    InventTrans                     = InventTrans::findTransId(_InventtransId);
    InventTransOrigin               = InventTransorigin::findByInventTransId(_InventtransId);
    QueryBuildDataSource.addRange(fieldNum(InventTrans,RecId)).value(int642str(InventTrans.recid));

    delete_from tmpInventTransWMS;
    tmpInventTransWMS.clear();
    inventTransWMS_Pick             = InventTransWMS_Pick::newStandard(tmpInventTransWMS,inventTransQuery);
    tmpInventTransWMS.initFromInventTrans(InventTrans);
    tmpInventTransWMS.initFromInventTransOrigin(InventTransOrigin);
    tmpInventTransWMS.InventQty     = _Qty;
    tmpInventTransWMS.InventDimId   = _InventDimId;
    inventTransWMS_Pick.writeTmpInventTransWMS(tmpInventTransWMS);
    inventTransWMS_Pick.updateInvent();
    SalesFormLetter                 = SalesFormLetter::construct(DocumentStatus::PackingSlip);
    SalesLine                       = salesline::findInventTransId(_InventtransId);
    SalesTable                      = SalesTable::Find(SalesLine.salesId);
    SalesFormLetter.update(SalesTable,systemDateGet(), SalesUpdate::PickingList, AccountOrder::None, false, false);   
}

Microsoft Dynamics Ax: How to pick and post packing slip

How to prevent user to leave a form – Set form modal

$
0
0

AX does not provide the possibility of making a form modal.

I found the following code, that solved the problem

For any form (not dialogue) possible do so…
but this it is necessary to use only as required if – it is impossible use "Always on Top")))
(the side effect – when calling from modal form other modal)
X++ code:——————————————————————————–>
public void run()
{
super();
this.setFormModal(this.hWnd(), true);
}
//———————————————————————
public void close()
{
super();
this.setFormModal(this.hWnd(), false);
}
//———————————————————————
void setFormModal(int _thisHWND, boolean _bModal)
{
DLL _winApiDLL;
DLLFunction _EnabledWindow;
DLLFunction _getTop;
DLLFunction _getNext;
DLLFunction _getParent;
void local_enableWHND(int _lHWND)
{
int lnextWnd;
lnextWnd = _getTop.call(_getParent.call(_lHWND));
while (lnextWnd)
{
if (lnextWnd != _lHWND)
_enabledWindow.call(lnextWnd, (!_bModal));
lnextWnd = _getNext.call(lnextWnd, 2);
}
}
;
_winApiDLL = new DLL(‘user32′);
_getNext = new DLLFunction(_winApiDLL, "GetWindow");
_EnabledWindow = new DLLFunction(_winApiDLL, "EnableWindow");
_getTop = new DLLFunction(_winApiDLL, "GetTopWindow");
_getParent = new DLLFunction(_winApiDLL, "GetParent");
_getParent.returns(ExtTypes:: DWORD);
_getParent.arg(ExtTypes:: DWORD);
_EnabledWindow.returns(ExtTypes:: DWORD);
_EnabledWindow.arg(ExtTypes:: DWORD, ExtTypes:: DWORD);
_getTop.returns(ExtTypes:: DWORD);
_getTop.arg(ExtTypes:: DWORD);
_getNext.returns(ExtTypes:: DWORD);
_getNext.arg(ExtTypes:: DWORD, ExtTypes:: DWORD);
local_enableWHND(_thisHWND);
local_enableWHND(_getParent.call(_thisHWND));
}
X++ code:——————————————————————————–<

Found here: http://dynamicsuser.net/forums/t/16640.aspx


AX 2012 Creating report with report Data provider [RDP] as data source

$
0
0

Report Data provider [RDP] as data source type in data set – SSRS reports [Dynamics ax 2012]

I am excited to share this new source of data[RDP] for the dataset..We all know in the older version, for a dataset we had only Query and Business logic as a dataset source in SSRS reports. Now in the current version, we have actually 4 options : Query, Business Logic, Report data provider and AX Enum provider.

Today, I will be covering the Report data provider. An RDP class is an X++ class that is used to access and process data for a Reporting Services report. An RDP class is an appropriate data source type when the following conditions are met.

hmmmm.. confused..let me explain with an example. It will be all clear soon :)

First things first: The following elements are required to set RDP as your data source type.

step 1: Query
step 2: Temporary table – RDP class fills a temporary table with data that will be used by Reporting Services to display the report.
[msdn help]
step 3:Data contract class – To define the parameters in the report.

step 4:Report data provider class – processes business logic based on parameters and a query, and then returns the tables as a dataset for the report. [msdn help]

Let me explain all the steps mentioned above with an example:

For step 1: Create a new query by name SR_CustTable and add the dataasource as CustTable as shown below


Next step 2: Let us create a new temporory table by name TmpSR_CustTable and add 4 new fields as shown below. Ensure that you set the Table type propert as TempDB or InMemory

Use an InMemory temporary table if the dataset is small, for reports that will display fewer than 1000 records.

Use a TempDB temporary table for large datasets to improve performance.

In the below Table: I have set the Table type property to TempDB to improve the performance.Also, I have dragged dropped 4 fields AccountNum, Blocked, priceGroup, Currency as shown below.

Step 3: Now we need to Data Contract class – which will help to define parameters in the report.

Create a new class by name "SRSRDPCustTableContractClass" and add a AccountNum global variable as shown below

class SRSRDPCustTableContractClass
{
AccountNum accountNum;
}
______________________________________________
Add one more parm method to it as shown below

[DataMemberAttribute("AccountNum")]
public AccountNum parmAccountNum(AccountNum _accountNum = accountNum)
{
accountNum = _accountNum;
return accountNum;
}
________________________________________________
Done…Lets move to Step 4

Step 4:
Now we need to create Report Data provider class
Create a new class by name "SR_CustTableRDP" that should extend SRSReportDataProviderBase class.

Attach the SRSReportQueryAttribute attribute to specify the query to use to get the data for the report.

For this example, set the attribute to the SR_CustTable query.

Attach the SRSReportParameterAttribute attribute to specify the data contract class that defines the report parameters for the report.

For this example, set the attribute to the SRSRDPCustTableContractClass.

[ SRSReportQueryAttribute (querystr(SR_CustTable)),
SRSReportParameterAttribute(classstr(SrsRDPCustTableContractClass))
]

class SR_CustTableRDP extends SRSReportDataProviderBase
{
TmpSR_CustTable tmpSR_CustTable;
}
_________________________________________________________
Now we need 3 more methods to be added

///
/// Processes the report business logic.
///

///
/// Provides the ability to write the report business logic. This method will be called by
/// SSRS at runtime. The method should compute data and populate the data tables that will be
/// returned to SSRS.
///
[SysEntryPointAttribute(false)]
public void processReport()
{
QueryRun queryRun;
Query query;
CustTable custTable;
SRSRDPCustTableContractClass srsRDPCustTableContractClass;
AccountNum accountNum;
QueryBuildDataSource queryBuildDataSource;
QueryBuildRange queryBuildRange;

query = this.parmQuery();

srsRDPCustTableContractClass = this.parmDataContract() as SRSRDPCustTableContractClass;
accountNum = srsRDPCustTableContractClass.parmAccountNum();

// Add parameters to the query.
queryBuildDataSource = query.dataSourceTable(tablenum(CustTable));

if(accountNum)
{
queryBuildRange = queryBuildDataSource.findRange(fieldnum(CustTable, AccountNum));
if (!queryBuildRange)
{
queryBuildRange = queryBuildDataSource.addRange(fieldnum(CustTable, AccountNum));
}
// If an account number has not been set, then use the parameter value to set it.
if(!queryBuildRange.value())
queryBuildRange.value(accountNum);
}

queryRun = new QueryRun(query);

while(queryRun.next())
{
custTable = queryRun.get(tableNum(CustTable));
this.insertTmpTable(CustTable);

}
}
________________________________________________

///
/// This method inserts data into the temporary table.
///

///
/// Table buffer of CustTable table.
///

private void insertTmpTable(CustTable _custTable)
{
tmpSR_CustTable.AccountNum = _custTable.AccountNum;
tmpSR_CustTable.Blocked = _custTable.Blocked;
tmpSR_CustTable.PriceGroup = _custTable.PriceGroup;
tmpSR_CustTable.Currency = _custTable.Currency;
tmpSR_CustTable.insert();

}
____________________________________________
[SRSReportDataSetAttribute("Tmp_SRCustTable")]
public tmpSR_CustTable getTmpSR_CustTable()
{
select * from tmpSR_CustTable;
return tmpSR_CustTable;
}
________________________________________________
wow…we are done with all the steps mentioned above and I am excited to help you guys understand how to use the RDP class as a datasource for the dataset. For this we need to create a new report in the visual studio .

Follow me friends…[I am assuming that all the visual tools have been installed and you have report model template available to created the reports]

Open visual studio. Click on File >> New project and follow the below process.

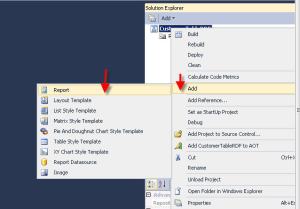
Now add a new report to the report model by right clicking and selecting new report as shown below

Rename the report to "SR_CustTableRDPReport" as shown below by going to the properties of the report

Now the next thing what we have to do [the most awaited...] is to create a dataset for this report.

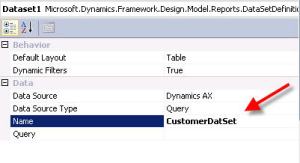
Right click on the DataSet and add new dataset as shown below. Rename it to CustomerDataSet as shown below

Go to its properties and rename it to "CustomerDataSet"

Now the real trick, we have a datasource type property on the dataset properties. Select report data provider as the datasource type as show below.

Select the query property and Click on the ellipsis (…) button to selct the RDP class which you have created in the step 4 as shown below

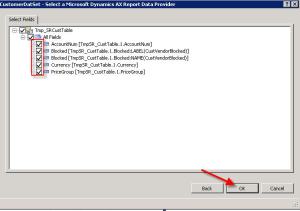
This will come up with all the RDP classes available in AX. Select SR_CustTableRDP Class and click on next button to select the fields from the tmpTable to shown it on the report.

Follow the below screen shot to select the fields and click on Ok button

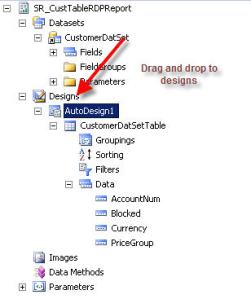
wonderful..we are done with dataset..Only few steps now..Now we need to create design. Drag and drop this CustomerDataSet to Designs node. It will automatically create the Autodesign1 as shown below

Few more properties for good look and feel of reports : Right click on the Autodesign1 and set the
LayOutTemplate as ReportLayoutStyleTemplate as shown below

Then set the style template as TableStyleTemplate as shown below

Also, since I dont have data in default DAT Company, I would like to use company parameter as well. so I am unhiding the company parameter to select the company parameter along with the Account number [step 3 parameter]

To do this, follow me and change the hidden property to visible as shown below for company parameter

Thats it..Now let us run this report.

Right click on the Autodesign1 and select option Preview and select the parameters as shown below

Select the report Tab to view the report. It will take some time to render data.

Here comes the final data on the report – from the RDP class by inserting in to temporary table and showing the same on to report.

hmmmm.. I am done..Hope you understood how RDP classes will help to render the data on to report by using the temporary table concept and Data contract classes. In my last post I have explained how to add this report to the AX menu item.. Follow the same process and check the report by opening from within AX.That’s it for now..
Happy Dax6ng,
Sreenath

This text vas found here.

How to Build QueryRanges

$
0
0

queryBuildDataSource = query.dataSourceTable(tablenum(CustPackingSlipTrans));

if(deliveryDateFrom && deliveryDateTo)
{
    queryBuildRange = queryBuildDataSource.findRange(fieldnum(CustPackingSlipTrans, DeliveryDate));
    if (!queryBuildRange)
    {
        queryBuildRange = queryBuildDataSource.addRange(fieldnum(CustPackingSlipTrans, DeliveryDate));
    }
    if (!queryBuildRange.value())
    {
        queryBuildRange.value(queryValue(
            strFmt(‘((DeliveryDate >= %1) && (DeliveryDate <= %2))’,
                date2StrXpp(deliveryDateFrom),
                date2StrXpp(deliveryDateTo)
            )
        ));
    }
}

Import from csv

$
0
0

static void GITS_ESH_CleanupCustomer(Args _args)
{
    CustTable           custTable;
    CustTable           tmplCustTable;
    DirpartyTable       dirpartyTable;
    DirpartyTable       _dirpartyTable;
    DirpartyTable       tmplDirpartyTable;
    Address             address;
    Address             tmplAddress;
    container           c;
    Integer             Start, PartyStart;
    TextIo              io;
    str            fileName, FRS;
    TextBuffer          b;
    DirPartyType        DirPartyType;
    ExtendedTypeId      id;
    NumberSeq           num;
    DirPartyId          localDirPartyId;
    AccountNum          AccountNum;
//    Addressing          address;
    CustPaymModeTable   custPaymModeTable;
    Name                PaymName;
    int                 recordCount;
    str                 inLine;
    boolean             OK;
    ;
    fileName = @"C:\temp\xxx.csv";
    b=new Textbuffer();
    io = SysLicenseCodeReadFile::openFile(fileName,’r');

    c = io.read();
    if (!io)
        throw error(strfmt("@SYS18678",fileName));
    io.inFieldDelimiter(";");

    recordCount = 0;
    while (io.status() == IO_Status::Ok)
    {

        c = io.read();
        if (conlen(c) > 0)
        {
            AccountNum                          = conpeek(c,11);
            OK = true;
            if (OK)
                if (CustTable::find(AccountNum))
                {
                    info(strfmt("**** %1 er allerede oprettet",AccountNum));
                    OK = false;
                }
            if (OK)
            {
                recordCount += 1;

                custTable = CustTable::find("98823560");

                custTable.AccountNum                = AccountNum;
                custTable.Name                      = conpeek(c,5);
                custTable.NameAlias                 = custTable.Name;
                custTable.IdentificationNumber      = conpeek(c,1);
                custTable.Street                    = conpeek(c,6) + ‘\n’ + conpeek(c,7);
                custTable.CountryRegionId           = conpeek(c,8);
                custTable.ZipCode                   = conpeek(c,9);
                custTable.City                      = conpeek(c,10);
                custTable.Phone                     = conpeek(c,11);
                custTable.EinvoiceEANNum            = conpeek(c,12);
                custTable.Email                     = conpeek(c,13);
                custTable.PartyId                   = ”;
                custtable.PartyType                 = DirPartyType::Organization;

                custTable.Address = Address::formatAddress(custTable.Street,custTable.ZipCode,custTable.City,custTable.CountryRegionId,custTable.State,custTable.County);
//            custTable.PartyId = DirParty::createPartyFromCommon(custTable).PartyId;
                if (OK)
                    if (!AddressZipCode::exist(custTable.ZipCode))
                    {
                        info(strfmt("**** %1: Postnummer %2 ukendt", AccountNum, custTable.ZipCode));
                        OK = false;
                    }
                if (OK)
                {
                    custTable.insert();
                    info(strfmt("%1 OK",AccountNum));
                }

//            delete_from DirpartyTable
//               where DirpartyTable.PartyId == accountNum;
//            dirpartyTable = DirpartyTable::find(custTable.PartyId, true);
//
//            dirpartyTable.Type                 = DirPartyType::Organization;
//            dirpartyTable.Name                 = custTable.Name;
//            dirpartyTable.NameAlias            = custTable.Name;
//            dirpartyTable.LanguageId           = "DK";
//            dirpartyTable.PartyId              = AccountNum;
//
//            dirpartyTable.insert();
//
//            address.AddrRecId           = dirpartytable.RecId;
//            address.AddrTableId         = dirpartytable.TableId;
//            address.Name                = custTable.Name;
//            address.type                = addresstype::Delivery;
//            address.IsPrimary           = NoYes::Yes;
//            address.CountryRegionId     = custTable.CountryRegionId;
//            address.Street              = custTable.Street;
//            address.ZipCode             = custTable.ZipCode;
//            address.City                = custTable.City;
//            address.Address             = custTable.Address;
//
//            address.insert();
            }
        }
    }
    info("finish");
}

Adding code templates/shortcuts in AX 2012

$
0
0

If you’ve got any blocks of code that you use frequently, e.g. specific comment blocks, you can very easily add code short cuts in AX 2012 to auto-insert the them in to your X++ code.

For example you can setup AX to automatically create surrounding comment such as

whenever you type “mycom” and press the tab key.

How do you accomplish this. Very easily!

Step1: Locate the class EditorScripts in the AOT.
Step2: Create a new method with the format public void template_flow_[shortcut](Editor editor)
Step3: User the editor parameter to add code the code that you would like inserted. e.g. editor.insertLines(“\\test comment”);
Step4: Add your method to the case statement in the isApplicableMethod method in the section relating to template “editor scripts that does not apply to Macros”

Thats it, now if you type your shortcut into any editor in AX and press tab, the “\\test comment” code will be inserted.

Here’s a full example method

The above creates the following output:

—————————

I found the information here: http://workflowax.wordpress.com/2012/03/19/527/

AxEditorAdvanced–an extension to so called XPP Editor in Dynamics AX

$
0
0
Short Description:

AxEditor Advanced is a little Extension of the so called XPP Editor in Dynamics AX.
It allows you to perform EditorScripts or AxEditorAdvanced AddIns with Shortkey.
AxAdvancedEditor is coded fully in XPP, it’s for free and of course (what else) Open Source ;)

Available and tested for:

Dynamics AX 4.0
Dynamics AX 2009

First of all:

If you find any Bugs or if you have any improvement Ideas, please feel free to contact me!
( moc.scainamssab@xascimanyd )
If you create any AddIn it would be nice if you would make it public (Here is how you can create your own AddIns)

Installation:

1) Download latest Version of AxEditorAdvanced here… or here…
2) Import .xpo Project (normally there is nothing to merge)
3) Sync and Compile Project (and hope that there aren’t any Errors ;) )
4) Add some Code to the EditorScripts Class (hack for getting the Editor) in the “container getApplicableScripts(Editor e)” Method after the internal “applicableMethod()”

Code

  1. // BAC Begin AxEditorAdvanced Entry Point
  2. // Jump Into Shortcut Action if we are in Simulation Mode (ParmShortcutAction)
  3. // That means we have captured a Hotkey and need the Editor Object to do our nice scripts
  4. if(appl.BACGetAxEditorAdvanced().ParmShortcutAction())
  5. {
  6. appl.BACGetAxEditorAdvanced().ParmEditor(e);
  7. // Return connull to prevent opening the AX Editor &#8211; Scripts Shortcut Popup
  8. return connull();
  9. }
  10. // BAC End AxEditorAdvanced Entry Point

6) Add an Instance Variable to the Global Application Class (AxAdvancedEditor Instance)

Code

  1. // BAC Begin AxEditorAdvanced
  2. // Base Class for AdvancedEditor handling. Has to be “Global” for some reasons
  3. BACAxEditorAdvanced             axEditorAdvanced;
  4. // BAC End AxEditorAdvanced

7) Add a Method to the Global Application Class (AxAdvancedEditor Instance)

Code

  1. // Creates and Returns Base Class for Advanced Editor System
  2. // This class has to be global defined for several issues
  3. BACAxEditorAdvanced BACGetAxEditorAdvanced()
  4. {
  5. if(!axEditorAdvanced)
  6. axEditorAdvanced = new BACAxEditorAdvanced();
  7. return axEditorAdvanced;
  8. }

8) Compile those Classes (Maybe you should restart AX to be sure)

9) Now you are nearly done. You only have to Open the Form “BACAxEditorAdvanced” which will be invisible.

10) If you like to, you can add a Code in the “StartupPost” Method at the “Info” Class and open the Form automatically each start of Dynamics AX

11) Go on reading the “How to use” Information

How to use:

Open Form “BACAxEditorParameters” to define Hotkeys which you want to use.

To define a Hotkey, set Cursor to “Hotkey” Field and press the Hotkeys you like to use

(Be Aware:  You can’t use Hotkey Sequences that are reserved by the System or DAX)

Then you can deside if you want to link the Hotkey with an EditorScript or with an AxEditorAdvanced AddIn. If you choose an AxEditorAdvanced AddIn there may be some Parameters to set which can be done by clicking the Empty Column at the End of the Grid (i didn’t find a nice icon ;) ). You can also define Hotkeys to open the Paramters of an AddIn. This may be usefull some times. To remove a Hotkey for a Parameter Call, click the white Column next to the Parameter Hotkey (again I didn’t find a nice icon until now ;) )

Installing AxEditorAdvanced AddIns:

Installing add ins is quite Simple.

Download any AddIns or AddInPack, import .xpo files, Compile Files and run Main Class(es).

The AddIn will install itself. Now you may Choose it in the Parameters.

Create own Add Ins:

Here you get Info about hwo creating your own AddIn for AxEditorAdvanced

How i created it (technical stuff):

Klick here

  • Comments(1)
One Response to “AxEditorAdvanced”
  1. # Alexon 15 Dez 2010 at 09:45

    Good job!

    You can also use AxAssist tool for an advanced features like extended IntelySense in DAX Editor.

———————————————

I found it here: http://dynamicsax.bassmaniacs.com/axeditoradvanced/

How to disable AutoComplete functionality on controls

$
0
0

In this article: http://tech.alirazazaidi.com/how-to-disable-autocomplete-functionality-on-controls-dynamics-ax/ i found this:

How to disable autocomplete functionality on Form Control in dynamics Ax.

Currently I was facing the problem of autocomplete functionality, every time user enter text for search, stringEdit control filled with autocomplete and error message display. I was using TextChange Method of String Edit Control. I add the following line of code in TextChange method alongside other code that works for search functionality.

element.delAutoCompleteString(this);

If you want to disable functionality on single control you can add same code text modify of control like as

public boolean modified()
{
boolean ret;
;

ret = super();

element.delAutoCompleteString(this);

return ret;
}

Sometimes we have to disable the autoComplete at application level so all autocomplete functionality will disable on all control. For this purpose you have the override the leave method of StringEdit:FindEdit field on theSysFormSearch form that is in the FindGrp group: as

ret = super();
if (ret)
element.delAutoCompleteString(this);

return ret;

Split up string

$
0
0

List strSplit(str _stringToSplit, str _delimiters)
{
    List list = new List(Types::String);
    int oldPos = 1;
    int pos;
    int strLength = strLen(_stringToSplit);

    do
    {
        pos = strFind(_stringToSplit, _delimiters, oldPos, strLength);
        if (!pos)
            pos = strLength+1;

        list.addEnd(subStr(_stringToSplit, oldPos, pos-oldPos));
        oldPos = pos+1;
    } while (pos <= strLength);

    return list;
}

container splitString(str _str, str _del)
{
    List            listStr = new List(Types::String);
    ListIterator    iteratorStr;
    container       conStr;
    ;
    listStr = strSplit(_str, _del);
    iteratorStr = new ListIterator(listStr);
    while(iteratorStr.more())
    {
        conStr += iteratorStr.value();
        iteratorStr.next();
    }
    return conStr;
}


How to debug Windows Script Host, VBScript, and JScript files

$
0
0

To debug WSH scripts in Microsoft Visual InterDev, the Microsoft Script Debugger, or any other debugger, use the following command-line syntax to start the script:

wscript.exe //d <path to WSH file>
				

This code informs the user when a runtime error has occurred and gives the user a choice to debug the application. Also, the//x flag can be used, as follows, to throw an immediate exception, which starts the debugger immediately after the script starts running:

wscript.exe //d //x <path to WSH file>
See: http://support.microsoft.com/kb/308364

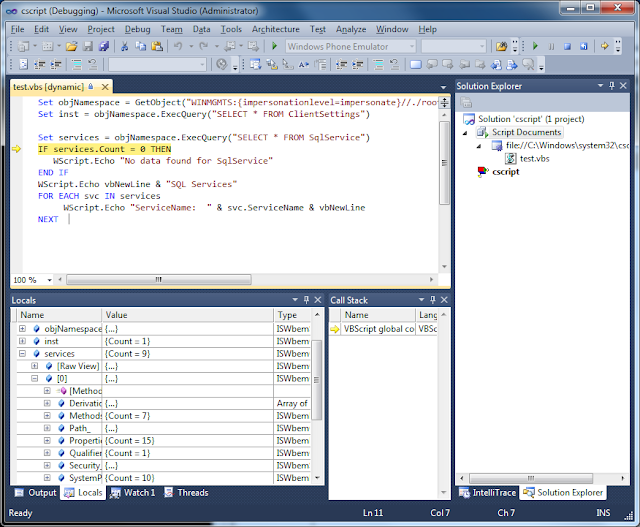
In order to debug .vbs file, you can specify "//D //X" options in script host. Both Windows-based script host (wscript.exe) and Command-based script host (cscript.exe) supports the same options. When //D //X options are specified, Visual Studio debugger will be launched and start debugging for the VB script. wscript displays output in Window form such as message box while cscript displays output into the console.

This command invokes VS debugger for test.vbs script file.

C:\Temp>wscript //D //X test.vbs

or

C:\Temp>cscript  //D //X test.vbs

[F10] key executes the VB script line by line.

See: http://debugbeyond.blogspot.dk/2010/10/how-to-debug-vbscript-vbs.html

Get next PurchID from Number Sequence through X++

$
0
0
Get the Number Sequence through X++

//This following code to get the number sequece by using code.
//this following example describe to get purchID and ProjJournalID
ProjJournalTable _projJournalTable;
PurchTable _PurchTable;
_projJournalTable.JournalId = NumberSeq::newGetNum(ProjParameters::numRefProjJournalId()).num();
_PurchTable.PurchId = NumberSeq::newGetNum(PurchParameters::numRefPurchId()).num();


Found here: http://axhelper.blogspot.dk/2011/10/get-number-sequence-through-x.html

Create and post Inventory Movement Journal by X++ code

$
0
0

Following is the sample job to show how we can create and post movement journal by making use of available api’s in the Dynamics AX.

static void createMovJournal(Args _args)
{
    InventJournalTable journalTable;
    InventJournalTrans journalTrans;
    InventJournalTableData journalTableData;
    InventJournalTransData journalTransData;
    InventTable inventTable;
    InventDim inventDim;
    Counter cnt;
    InventJournalCheckPost journalCheckPost = new InventJournalCheckPost();
    ;
    journalTableData = JournalTableData::newTable(journalTable);
    journalTransData = journalTableData.journalStatic().newJournalTransData(journalTrans,journalTableData);

    // Init JournalTable
    journalTable.clear();
    journalTable.JournalId = journalTableData.nextJournalId();
    journalTable.JournalType = InventJournalType::Movement;
    journalTable.JournalNameId = journalTableData.journalStatic().standardJournalNameId(journalTable.JournalType);
    journalTableData.initFromJournalName(journalTableData.journalStatic().findJournalName(journalTable.JournalNameId));

    // Init JournalTrans
    select firstonly inventTable;
    for(cnt=1;cnt<10;cnt++)
    {
        journalTrans.clear();
        journalTransData.initFromJournalTable();
        journalTrans.TransDate = systemdateget() + 1 div 2;
        journalTrans.ItemId = inventTable.ItemId;
        journalTrans.Qty = 100;
        journalTrans.CostAmount = 100;
        // Dimension details
        inventDim.InventLocationId = ‘GW’;
        journalTrans.InventDimId = InventDim::findOrCreate(inventDim).inventDimId;
        journalTransData.create();
    }

    journalTable.insert();

    // Call the static method to post the journal
    if(InventJournalCheckPost::newPostJournal(journalTable).validate())
        InventJournalCheckPost::newPostJournal(journalTable).run();
}


Found here: http://learnax.blogspot.dk/2010/01/x-code-to-create-and-post-inventory.html

Marking Inventory by x++ code

$
0
0

I found several samples that solved the problem in AX2009.
At last I found the following code:

static void testXppMarking(Args _args)
{
    InventTrans issueInventTrans;
    TmpInventTransMark tmpInventTransMask;
    Map mapMarkNow;
    container con;
    real qty;
    Map mapTmp;
    MapEnumerator mapEnumerator;
 
    InventTransOriginId issueInventTransOriginId =
        InventTransOrigin::findByInventTransId(‘Issue lot ID’).RecId;
 
    InventTransOriginId receiptInventTransOriginId =
        InventTransOrigin::findByInventTransId(‘Receipt lot ID’).RecId;   
 
    InventQty qtyToMark = 11;
 
    ttsBegin;
 
    issueInventTrans = InventTrans::findByInventTransOrigin(
        issueInventTransOriginId);
 
    [con, qty] = TmpInventTransMark::packTmpMark(
        InventTransOrigin::find(issueInventTransOriginId),
        issueInventTrans.inventDim(),
        issueInventTrans.Qty);
 
    mapTmp = Map::create(con);
    mapEnumerator = mapTmp.getEnumerator();
    while (mapEnumerator.moveNext())
    {
        tmpInventTransMask = mapEnumerator.currentValue();
 
        if (tmpInventTransMask.InventTransOrigin == receiptInventTransOriginId)
        {
            tmpInventTransMask.QtyMarkNow = qtyToMark;
            tmpInventTransMask.QtyRemain -= tmpInventTransMask.QtyMarkNow;
            mapMarkNow = new Map(Types::Int64, Types::Record);
            mapMarkNow.insert(tmpInventTransMask.RecId, tmpInventTransMask);
 
            TmpInventTransMark::updateTmpMark(
                issueInventTransOriginId,
                issueInventTrans.inventDim(),
                -qtyToMark,
                mapMarkNow.pack());
 
            break;
        }
    }
 
    ttsCommit;
}


Found here: http://community.dynamics.com/ax/b/dynamicsaxnotesonthecuffs/archive/2013/01/08/marking-from-code-part-2.aspx#.Ui7AzZ3U9hE

Show changed fields in a record or row

$
0
0

How to compare a record with the origin record

static void changedFields(Common _rec)
{
    Common          recOrig;
    DictTable       dictTable;
    DictField       dictField;
    SysDictField    sysDictField;
    int             i;
    int             j;
    ;

    if (!_Rec)
    {
        info("_rec er ikke angivet");
        return;
    }

    recOrig = _rec.orig();
    dictTable = new DictTable(_rec.TableId);

    if (dictTable)
    {
        for (i = 1 ; i <= dictTable.fieldCnt() ; i++)
        {
            dictField = new DictField(dictTable.id(), dictTable.fieldCnt2Id(i));

            if(dictField && !dictField.isSystem())
            {
                if (dictField.arraySize() > 1)
                {
                    for( j = 1; j <= dictField.arraySize(); j++)
                    {
                        sysDictField = new SysDictField(dictTable.id(), dictField.id(), j);
                        //writeString += strfmt(‘"%1"’,_rec.(sysDictField.id()));
                        if (_rec.(sysDictField.id()) != recOrig.(sysDictField.id()))
                        {
                            info(strfmt(‘    %1: "%2"->"%3"’,dictTable.name()+’.'+dictField.name()+’_'+int2str(j),recOrig.(sysDictField.id()),_rec.(sysDictField.id())));
                        }

                    }
                }
                else
                {
                    //writeString += strfmt(‘"%1"’,_rec.(dictField.id()));
                    if (_rec.(DictField.id()) != recOrig.(DictField.id()))
                    {
                        info(strfmt(‘    %1: "%2"->"%3"’,dictTable.name()+’.'+dictField.name(),recOrig.(DictField.id()),_rec.(DictField.id())));
                    }
                }
            }
        }
    }
}

Viewing all 53 articles
Browse latest View live